s);}}(document,"script","twitter-wjs");
Google
 
"https://twitter.com/EdwinChew85" class="twitter-follow-button" data-show-count="false" data-size="large">Follow @EdwinChew85

Saturday, April 30, 2011

Flour types


There are a variety of flours available on the market.

Often,we do get a headache over which flour is best for our recipes

They are generally classified according to protein content, into high-gluten,medium-gluten and low-gluten.
Below is a table showing comparisons of the protein level and texture indifferent types of flour


Type of flour

Protein content

Texture

Idea for
Bread Flour

10-12%

hard

Bread,Pizza
Self-raising

9.5-11.5%

hard

Deep-frying
All-purpose/Plain Flour

9-11%

intermediate

General baking,yu tiao,roti-prata
Cake Flour

8.5-10

soft

Pound Cake,Sponge Cake
Superlite Flour


Soft,light

Steamed buns
Top Flour


Smooth,fine

Chiffon,Swiss roll

Friday, April 22, 2011

Colourful Macaroons


Ingredients
175g icing sugar
125g ground almonds
3 large free-range egg whites
75g caster sugar
20 ml water

For the Buttercream filling
150g butter, softened
75g icing sugar


For the Custard fillings
½ cup (120 g) of sugar
4 egg yolks
1 stick (120 g) of butter
2 organic lemons

Directions
1. Preheat Methothe oven to 160°C/fan140°C/gas 3. Whizz the icing sugar and ground almonds in a food processor to a very fine mixture, then sift into a bowl.


2. Add the sugar to 20ml of water in a sauce pan, and heat until 245oF.

3. In a separate bowl, whisk the egg whites with a pinch of salt to soft peaks, then gradually whisk in the syrup until thick and glossy.(At this point you can stir in flavour extract, such as peppermint or lemon, and corresponding colouring such as blue or yellow, to your meringue mixture, depending on what kind of macaroons you want – see chef's tip. Or divide the meringue among different bowls if you want to make more than one colour.

4. Fold half the almond and icing sugar mixture into the meringue and mix well. Add the remaining half, making sure you use a spatula to cut and fold the mixture until it is shiny and has a thick, ribbon-like consistency as it falls from the spatula. Spoon into a piping bag fitted with a 1cm plain nozzle.

5. Line 2 baking sheets with baking paper. Pipe small rounds of the macaroon mixture, about 3cm across, onto the baking sheets. Give the baking sheets a sharp tap on the work surface to ensure a good ‘foot’. Leave to stand at room temperature for 10-15 minutes to form a slight skin. This is important – you should be able to touch them lightly without any mixture sticking to your finger. Bake for 15 minutes. Remove from the oven and cool.

6. Meanwhile, make the filling/s (unless making chocolate macaroons – see chef's tip). In a bowl, beat the butter until light and fluffy, then beat in the icing sugar. (You can now add flavouring or nuts, and colour – see chef's tip.)Use to sandwich pairs of macaroons together.


Alternatively, you can make custard fillings,beat the yolks with the sugar in a bowl and pour them into a small saucepan together with the juice and the zest of the 2 lemons... cook on a low flame until the custard is nice and thick, as you can see; then remove the pan from the heat and fold in the softened butter.(You can now add flavouring or nuts, and colour – see chef's tip). When the butter is completely melted, place the custard in the fridge to set.

Chef's tip
To flavour and colour your macaroons, in step 2, add around ½ tsp flavour extract, then add the appropriate colouring, a drop at a time, until you reach the desired intensity. Flavour and colour the buttercream in the same way.

For chocolate macaroons, replace a quarter of the icing sugar with cocoa powder and use Nutella as the filling.

For pistachio macaroons, replace half the ground almonds with ground pistachios (whizz in a blender or finely chop by hand), and use green food colouring to achieve a pastel green. Fold chopped pistachios through the filling, if you like

Labels:

Thursday, April 14, 2011

Russian Napoleon Cake


Ingredients
________________________________________
For pastry:
• ==========
• 2 eggs
• 1 cup sour cream (regular or light)
• 2 sticks unsalted butter
• 1/4 tsp salt
• 1/3 tsp baking soda
• 1 tbsp white vinegar
• all-purpose flour enough to make soft dough

For cream:
• ==========
• 1 1/2 quarts of whole milk
• 1 cup of milk (this is not a mistake)
• 1 1/2 cups white sugar
• 4 egg yolks
• 4 very full tbsp flour
• Pinch of salt
• 1 shot of vodka, brandy, or rum
• (Amaretto or Bailey's are also good)
• 1 lemon (zest only)
• vanilla essence or vanilla powder to taste
• Pinch of nutmeg
• 1 1/2 sticks unsalted butter

Directions


______________________________________
Pastry:
-------
Mix eggs, soft butter and sour cream together till they blend well. Add salt.
In a table spoon, dissolve baking soda in vinegar - you will see "bubbles". When bubbling stops, add soda+vinegar to your mixture. Stir well.
Start adding flour, cup-by-cup, make soft smooth dough. Don't knead it too much, just enough to make it smooth and "un-sticky".

Split dough into 16 pieces, form little balls.
Cover the dough with plastic, and put in the fridge to chill.
While it's chilling, prepare cream.

Custard Cream:
--------------
Pour 1 1/2 quarts of milk into thick bottom pot and bring it to boil.
Don't use aluminum pots - it will burn !

While the milk is warming up, prepare the cream mix:
Separate egg yolks and stir them very well with sugar and a pinch of salt
- until mix turns very light yellow.

Add flour, mix well.

Add 1 cup cold milk, mix very well. Avoid lumps.

When your milk starts to boil, reduce the heat immediately to low.

Pour the cream mixture into boiling milk very slowly, using a whisk to stir the cream.

Bring the mixture to boil again, constantly stirring it.
When it starts boiling, you will see it become thicker.
Let it simmer for 2-3 minutes, don't forget to stir at all times.

Remove from the stove, add lemon zest, vanilla, nutmeg, and vodka (rum, brandy, or liquor).

When you are able to touch the pot, add butter and mix it in as it melts. Set aside.

Back to pastry:
-------------------
Preheat oven to 420 degrees F.

Turn off the phone, so no one can distract you for 1 hour.
a. Get 1 piece of dough from the fridge, roll it into a very thin crust on well floured surface - as thin as you can, forming a round or a square crust.

b. Roll the crust onto rolling pin, and unroll it onto UNGREASED baking sheet.

c .Pierce crust with the fork all over.

d. Bake in the oven for 2 minutes or until lightly golden. Don't over bake. It is better when it is not dark.

e. Remove the crust from the oven and put aside.
Repeat steps a-e for all the rest of the dough.

Never leave the kitchen while the crust is in the oven - check it all the time - it bakes very quickly.
Bake the last crust a little longer than others, letting it turn brown.

Put one crust on the cake dish.
Pour a ladle full of cream onto it.
Use skimmer to spread the cream evenly on the crust.
Repeat for all crusts, except for the brown one.

Crush the brown crust on the board, using the rolling pin - just roll it over the crust several times - it will make great fine crumbs.

Pour the crumbs over the top layer of the cake.

Let the cake soak for 2-3 hours. Cut out the uneven edges, forming your favorite cake shape - square or round, or oval. You get to eat all of the cut-offs... mmmm...

Labels:

Napolean sponge

Ingredients


Pastry


2.6kg. self-rising flour
794g. butter, room temperature
1-3/4 cups. white sugar
1 egg yolk
1 tbsp. water
Raspberry jam

Cake


600g. butter (room temperature)
600g. white sugar
570g. self-rising flour
2 tbsp. milk
1/2 tsp. vanilla
2 eggs
Strawberry frosting
Shredded coconut


Directions


Cream butter and sugar. Blend egg yolk with water; mix with butter and sugar mixture. Blend in flour. Roll out very thin. Line a grease lamington tin with half of the pastry. Prick well and spread with a good layer of raspberry jam.

Cake:

Cream butter and sugar. Beat in eggs. Fold in flour, then milk and vanilla. Pour this mixture into the pasty case, making a slight hollow in the center. Roll out the remaining half of the pastry; spread with raspberry jam. Place on top of cake with jam side face down.

Bake in moderate oven 180ºC/350ºF for 35-40 minutes, or until pastry is browned and sponge cake is done. Turn onto a wire rack to cool. When cold frost with strawberry flavoured pink frosting, then sprinkle with shredded coconut.

Labels:

Sunday, November 21, 2010

Konashi- Japanese sweets


Konashi is a kneaded sweet bean paste made by mixing
koshian (smooth red
bean paste) with flour. It is steamed and kneaded allowing it to be formed into
various shapes.


Ingredients:
white koshian (sweet smooth bean paste) 300gm (10.6oz) (a little harder than for the centers)
flour 30gm (approx. 3T)
mochiko (sweet rice flour) 3gm (approx. 1tsp)
granulated sugar 15gm (approx. 1/2oz)
mitsu (sugar water syrup)
white koshian (sweet bean paste) 200gm (7oz) for centers
food colorings

Preparation:
For the mitsu - (This sugar water syrup can be made in advance and kept in the refrigerator.)
Dissolve equal parts of sugar and water in a saucepan over low heat.
When the sugar is melted transfer to a glass container and let it cool.

For the konashi - Knead the flour and mochiko into the koshian until it is completely incorporated.

Place the mixture in a cloth lined steamer and steam over medium/high heat for approximately 15 minutes
or until all of the raw flour taste is gone.

Remove the cloth, and bean paste, from the steamer and knead further using clean damp cotton towels.
As you knead the bean paste, slowly incorporate the sugar.
(If the bean paste gets too sticky it can be kneaded using plastic film like Saran Wrap.)

Once the sugar has been completely incorporated, and the bean paste has cooled slightly,
the mitsu can be added. Continuing to use a damp towel knead in a small amount of the mitsu (approx. 1 to 2tsp).
Coat the outside of the konashi with some mitsu and place in a glass bowl to cool completely for several hours.
The bowl can be covered with plastic wrap after it cools to prevent it from drying out.
When ready to use, knead further using a little mitsu on your hands to prevent sticking.

NOTE - If coloring or flavoring is going to be used it can be kneaded in after the mitsu.

To make aoume, green plum shaped sweets,
prepare green konashi using green and yellow color.

Wrap about 25gm (.88oz) green konashi around a 15gm (.5oz) ball of white an (sweet bean paste).
Using a small piece of wood with sharp edges (like a kamaboko [fish cake] board),
press the pointed edge into the end of the konashi.
Rotate the sharp edge of the board to opposite side creating an indented line.

One recipe makes approximately 10 to 12 sweets.

To make chrysanthemum shaped sweets,
prepare light yellow, or other suitable colored, konashi.

Wrap about 30gm (1oz) konashi around a 15gm (0.5oz) ball of white an (sweet bean paste).
The finished shape should be slightly flattened and not round like a ball.
Using a small piece of wood with a sharp edge (like a kamaboko [fish cake] board),
press the pointed edge into the center of the konashi.
Rotate the sharp edge of the board to the far outside surface creating an indented line.
Do this many times around the sweet so you create the shape of a chrysanthemum.
A little white an that has been pressed through a fine sieve can be placed in the center of the finished sweet.
(You can make a little indentation in the center of the sweet with your finger before placing the an in.)

One recipe makes approximately 10 to 12 sweets.

Thursday, November 18, 2010

Kudzu Mochi


Kudzumochi are chewy cakes made of kudzuko. Kuzuko is the starch powder made from kuzu or kudzu plant root. It's used for thickening sauce or making cool desserts in Japanese cooking. Kudzumochi are semi transparent and often served with kuromitsu (brown sugar syrup) and kinako (soy bean flour).
Ingredients

Macha Kudzu Mochi -
25g Hon-Kudzu - Real Kudzu Powder (0.88 oz)
15g Granulated Sugar (0.53 oz)

1/2 tsp Matcha - Powdered Green Tea
125cc Water (0.53 u.s. cup)

Anko - Red Bean Paste
Dairy Cream

** If you use Katakuriko (Potato Starch), try the following recipe.
200ml Water (0.845 u.s. cup)
4 tbsp Katakuriko - Potato Starch
3 tbsp Sugar
1/2 tsp Matcha - Powdered Green Tea

- Regular Kudzu Mochi -
25g Hon-Kudzu - Real Kudzu Powder (0.88 oz)
10g Kibi Sugar - Similar to Brown Sugar but Less Bitterness (0.35 oz)
125cc Water (0.53 u.s. cup)

Kinako - Toasted Soybean Flour
Kuromitsu - Brown Sugar Syrup

** If you use Katakuriko (Potato Starch), try the following recipe.
200ml Water (0.845 u.s. cup)
4 tbsp Katakuriko - Potato Starch
2 tbsp Sugar


Directions

In a mixing bowl,add Kudzu powder,
sift mocha powder into the bowl
Add granulated sugar,and 1/3 of the water
Mix well until combined before stirring
in the remaining water.

Tranfer the mixture to a heating pot
by straining it through a sift.

In a seperate mixing bowl,add Kudzu powder,
Add kibi sugar,and 1/3 of the water
Mix well until combined before stirring
in the remaining water.

Tranfer the mixture to a bowl
by straining it through a sift.

Wet the sides of two baking pans
by rinsing with warm water.

*
Heat the Matcha Kudzu mochi mixture
by stirring it over meduim heat.
Bring it down to low heat,when bottom
starts to thickens.

Turn down the heat when mixture becomes
translucent,and continue to stir for 2 more
mins.

Pour mixture into one of the
baking tray.Cover with plastic wrap
Let cool.

Repeat the same for
the Regular Kudzu mochi mixture
from * onwards.


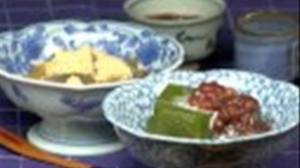
Cut the Matcha and Regular mochi into squares,
serve with Red Bean Paste and Dairy Cream &s
Toasted Soybean Flour and Brown Sugar Syrup.
Respectively.

Ichigo Daifuku


Mochi is a after meal desserts for the japanese,Ichigo daifuku is basically strawberry in a mochi.
Daifuku was originally called Harabuto mochi(腹太餅), which means one can fill up his stomach by eating it, (hmm, probably because of the generous amount of filling and the glutinous rice dough?).
Later, the name was changed to Daifuku mochi(大腹餅, big belly rice cake). Since the pronunciation of Fuku(腹, belly) and Fuku(福, fortune) is the same in Japanese, the name was further changed to Daifuku mochi(大福餅), and eventually it is known as Daifuku(大福, big fortune).


For the standard mochi skin you need

100g Shiratamako/Mochiko - Glutinous Rice Flour (3.53 oz)
2 tbsp Sugar
95-100ml Water (3.21-3.38 u.s. fl oz)

For the fillings you need

Katakuriko -Potato/ Katakuri Starch (for dusting)
150g Anko - Sweet Red Bean Paste (5.29 oz)
6 Strawberries (15g/0.53 oz per piece)

First remove leaves from strawberries.

Divide Red Bean Paste into 6 equal portions
Rolling them into balls.


Place strawberry in the center of Red Bean paste,
by pressing down the red bean paste
encasing the strawberry.
(place on a plate,cover with plastic wrap and set aside)

Dust baking dish with corn starch.

In a bowl, mix Glutinous Rice Flour & sugar with water.
Place into steamer,steam for 15 mins.

Scrap the mixture, onto the baking dish.
Knead to form dough of sixs,make into balls flatten.


Wrap the fillings in the center of the dough.
Ida takimasu!
Note:
Mochi made with mochi-ko are more sticky and less elastic, they dissolve more quickly on eating and do not have such a "rubbery" consistency, on comparisons mochi from Shiratama-ko are more elastic and subtle in flavor.

PhotobucketCREATE A LENS